Zombie
Admin
-
Joined
-
Last visited
Everything posted by Zombie
-
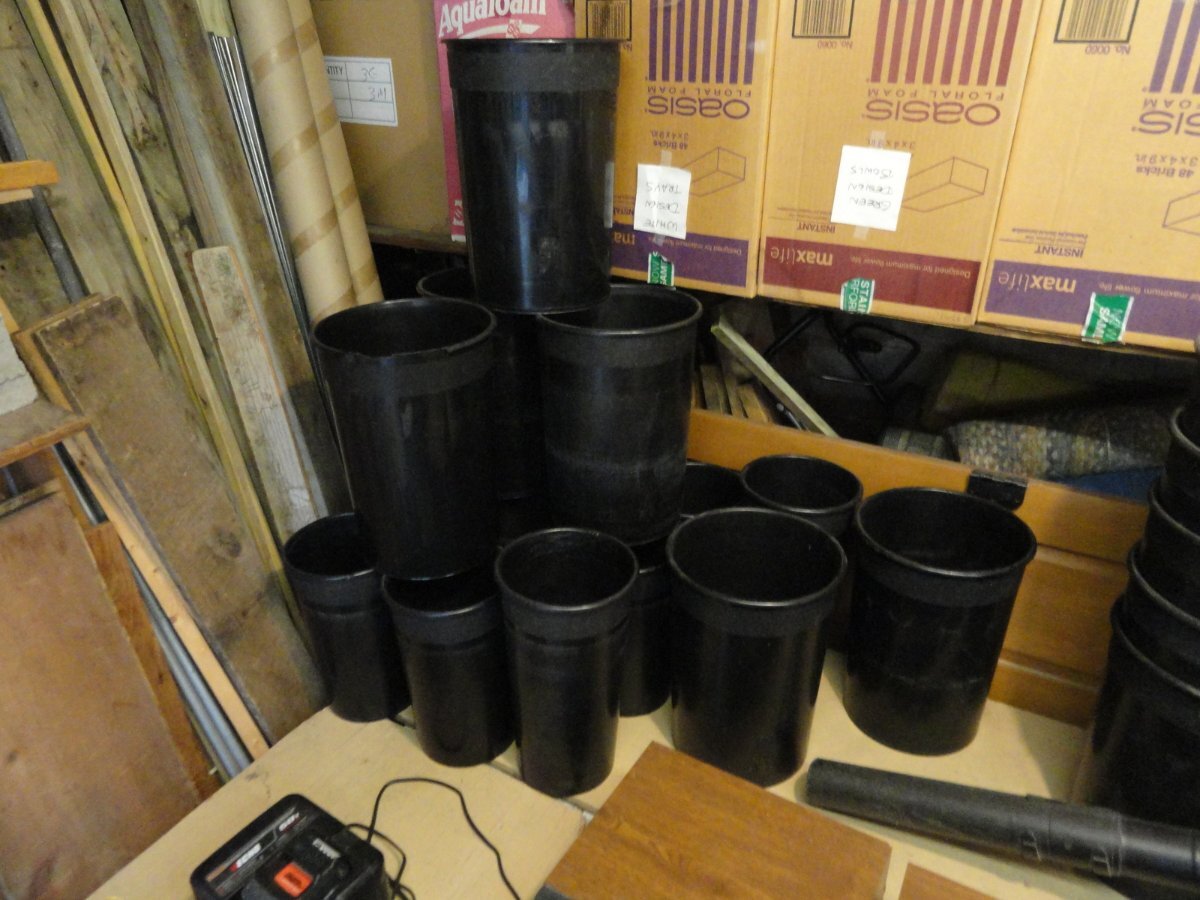
I always said: "You gotta make a mess to clean a mess" and the small garage is the perfect example. Pulled everything off the table (above it and below) and stacked that on the floor. Put a tarp over it so that it would limit cleanup. Pulled the table out too: And this is what the corner looked like: Needed a lot more sweeping as the floor and the walls were full of spider webs. Found a big box (it's on the floor to the right of the white hand brush on the table) filled with containers from a wedding long ago that was caked full of dust and dirt. That's gonna have to go eventually. I even cleaned off a section of the shelf: After sweeping the floor a number of times I figured I'd better put some of the mess away. Put the table back in it's usual spot in the corner stacked a few styrofoam boxes on it and some cardboard boxes underneath. Even washed the table top so that it would be somewhat clean: And here is the pile of dirt after sweeping: About the same size as the pile from the other corner, so it's a significant amount. I put more stuff away today and identified some more things I could get rid of (mostly cardboard boxes). I stomped the garbage in the dumpster down but didn't have a chance to dump anything else in there because it was pouring rain. Well, you'll know what I'll be doing tomorrow then. Gotta bring a few styrofoam boxes over to the apartment across the alley for storage until we need them again (probably Valentines). After that I should probably sweep up the piles of dust and then finish off putting stuff on the shelf. With that clean, my next area of conquest is going to be the other corner. That'll take some time to complete as there's a lot of stuff to move. Slowly but surely I'm making progress. - Zombie


-
True, part of the problem was when old bossman and his wife died a few years apart - I ended up "inheriting" a bunch of things from their home which I thought I'd use, but never did. Also there were things I stacked up on the shelves because we used to use it, but not anymore (old plastic liners with floral foam waxed to the bottom on the inside, paper mache funeral containers which we've switched to plastic, etc). Then there's the things that you naturally accumulate over time. And the stuff you put on the shelf to put away in it's usual spot, but never did because other things were piled on top of it. I put a lot of stuff away so far, so it's looking good in there. But there are a lot of areas that need to be cleaned yet. It's almost never-ending. - Zombie
-
I spent a little more time on Friday cleaning up in the small garage. Took everything off the shelves on the left side and moved most of the stuff under the shelves out. Threw out a lot of things. With the stuff out of the way I removed the shelves... I would rather sweep just the floor. And then came the messy task of blowing off the ceiling and between the joists. Finally I swept up what I could into a pile: This pile is about 6 inches (15cm) tall and a foot wide (30.5cm). This is what I was left with: I managed to put the shelves back up and moved the stuff I was going to keep either on the shelves or under them. There's still plenty of room left so I can fit more on the shelves for sure. Under, not so much, but there's a little. So that is part 1 of the cleaning. Right now the limiting factor is actually dumpster space. There's lots more I'd like to throw out but there just wouldn't be room. So this is going to have to be a 4 or 5 part project, and since garbage gets picked up every other week that means it might take to the end of the year to complete. Well, probably not that long. I haven't climbed into the dumpster to stomp it down yet and that usually compacts it by 50%. So I'll stomp it down sometime this week and then load it with more. Still need to complete my painting project on the east side of the building yet. I could probably paint the primed areas quickly then all that would be left to do is the tuck pointing. The new mortar could wait till next year to get coated so it isn't critical. - Zombie


-
Well, this is what the roof of the small garage looked like on Monday afternoon: The guys had just finished up putting the rubber membrane on the wall so I was happy they did that. Just in time too as it rained a little bit. Here's what the rubber looked like on the wall area: No leaks that I could see inside. The inside of the garage smelled like adhesive so I opened up the garage door and put on a fan. The smell wasn't overpowering, but noticeable - better be safe than sorry. I'm happy too, no more crawling up on the roof every few months to patch suspect areas. With that said though, it's been a real headache getting the inside all cleaned up. Since Monday I've been out in the garage for a couple hours each day sweeping up the mess. When the crew was sweeping/blowing the roof off getting it ready for the fiberboard decking, all the dust, some roofing nails, small pieces of hardened tar and sawdust filtered through the cracks and landed on everything inside. I cleaned off part of a shelf today and did some consolidating and then swept the floor and got another good sized pile: You may be able to see the pile just above the green watering can. Looks good, ready to put stuff away again, right? Oh no, up next is to take the stuff out from underneath the shelves and put that off to the side (after dusting it all off). Done now? Nope. After that it's a quick sweep to get the majority of the junk, then I'm going to take the leaf blower and blow the roof and the rafters to hopefully loosen any more of the stuff to fall down to the ground. After that is complete is when I'll start to put stuff away again. Kinda doing a bottom up approach instead of a top down because otherwise I'd be brushing tons of stuff off everything. This is what the middle and back of the garage looks like: The back section has been swept out already and I cleaned off the middle tables in order to stack stuff on there, out of the way. I'm going to concentrate on the front part of the garage first - getting that all blown off and swept up and things put away, for the simple fact that the spaces between the decking boards in that section were really close together which I'm hoping means less of a mess. As you get to the back of the garage, the spaces are wider which means more of a cleanup. Actually, this isn't such a bad thing as it gives me an excuse to clean house, make some hard decisions and toss stuff out that isn't being used, or will never be used etc. Wish me luck, this is going to be a real project! - Zombie


-
I made some time on Wednesday to prime all the areas I scraped on the east wall: And on Thursday it was another "caulkpocalypse": Again, apologies for the reflections. Here's what that long crack looked like all filled up: I actually caulked everything up to the window and used up a full tube plus a bit more. I'll brush the caulk/primed areas with one coat of base color so that the color doesn't show in the final coat. But, there's more scraping, priming and caulking necessary - including tuck pointing. As a refresher, this is what the roof of the small garage looked like one year ago: Finally got bossman to get the roof of the thing fixed. The crew started Saturday morning by tearing off the old crumbling roofing tar and tar paper. Didn't take them too long to do that, remove the nails, sweep the decking and start to install new 4x8 foot sheets of decking: Apologies, forgot to open the door. But you can see they have just under half complete. After the new decking was installed, they swept it off again and used a leaf blower to get rid of anything the broom missed. With a clean roof, they hauled up the big roll of rubber membrane, unrolled it and adjusted it to have the correct overlap. Then it was just a matter of pulling back half the membrane and rolling on a coat of adhesive on both the rubber and the decking. Here it is drying: After this set, they rolled the membrane back, pushed it down, and it was good to go. Obviously, they did the same steps for the other half except they had to contend with attaching it to the wall. I'll take some pics tomorrow of the final result. So happy I will not have to go up there and patch again! - Zombie


-
And here the cart is in all it's glory: Smelled and felt dry, but I decided to roll it into the greenhouse to "outgas" overnight. It was nice and toasty in there which will hopefully "bake" the finish on there. I felt 3 coats of paint were plenty since there's also primer and touch-up paint on areas too. Mark this off the list, time to move to something else, like the greenhouse again. I have a few spots I need to touch up on the tables in there, then it's ready for winter. - Zombie

-
I hesitate to use fire in this case as the nest is underground and I may accidentally catch the roots of the tree on fire. Underground fires are a real bear to deal with if they get out of hand. Granted, this is under a sidewalk and it just rained so it would probably be fine. Nah, to be safe I'll probably use expanding foam to fill the void, then mortar the crack full. I didn't see any more hornets going in or coming out on Saturday and Monday so I think the nest is dead now. Had some time yesterday to put another coat of blue paint on the rolling cart again: Not a very good pic, I'll admit. When it dries I'll roll it out into the sun for the big reveal. This is the final coat, so I can finally cross this off the list. I painted the threshold with another coat of polyurethane on Saturday morning. Didn't bother with using the stuff with the sand in it already - I just oped for sprinkling on some sand into the wet paint by hand. Seems like it's plenty rough now: This should be good enough too, unless I feel like it needs another coat. Was watching some more plastic welding videos this weekend and decided that the buckets that I plastic welded already would benefit from screening over the weld. So I did a bunch of them: Still have some more bigger black buckets that need screening. Took a pic of one that I'll need to smooth out some more after melting in the screening: I figured the screening would probably be necessary since the buckets take a real beating sometimes - and I don't feel like fixing a bunch of them when it's busy. - Zombie


-
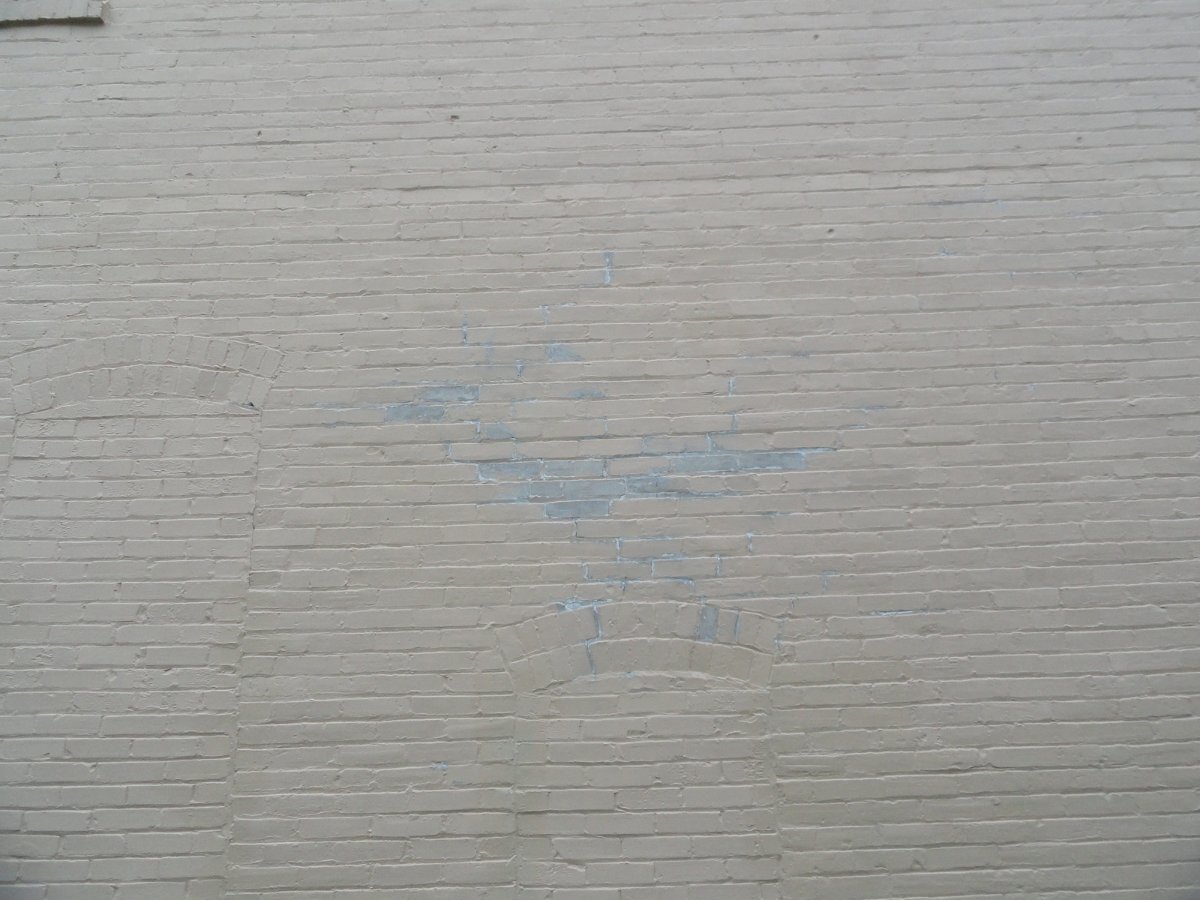
The other day I was able to do some more scraping on the east wall. I estimate another 16 feet so it's at least some progress: Yup, more reflections again. There's a section above the window where some of the mortar was crumbling so I got out the cold chisel and widened the joints: I still have some really old mortar mix somewhere, but I was worried it wouldn't set so I purchased another bag on Saturday just to make sure. Suppose I could slowly start to prime some of the scraped areas now that there's a good area ready. And caulking, can't forget about that. As a plus, I have plenty of caulk available. On Thursday I was using the leaf blower to blow some leaves from the sidewalk into the street for pickup and suddenly got a sharp pain in my shoulder. Didn't know what that was so I kept going. Then there was a sharp pain on my right leg. And another pain on my arm. I brushed the area with my hand and hit something. It was a hornet. And when I looked up I was getting swarmed so I took off running. Think I was stung about 6-8 times in total which wasn't fun. By the next day the pain was gone, but the areas were very itchy. Turns out there's a hornet nest under the sidewalk by one of the trees. I tried flooding the area with soapy water which didn't seem to do much. Tried "Brakleen" (brake parts cleaner) but that didn't seem to do much either. Had just a spritz of hornet and wasp killer spray left and that did significantly reduce the activity. But there were still some hornets flying around there on Saturday so I picked up a couple more cans of the spray. When I left, I didn't see anything going in or coming out anymore so maybe I got all of them. Will check on Monday to make sure. - Zombie

-
I had a little time the other day to mess around with those cracks in the round garbage cans. Yes, there were multiple cracks I found. Thanks to the polyurethane which made them visible. Got those areas sanded and welded up: And of course, I had to put a coat of primer on those spots too: There was some paint that chipped off the can on the left, so I scraped that down to the plastic and primed that too. The cans were already sanded so now I just have to out another coat of paint on them and then it should be done. Worked a bit more on the east wall too. Did about 18 feet worth - scraped, wire brushed and dusted off: Apologies, it was late in the day and the sun was reflecting off the neighbor's windows on to the wall. And the crack on the left was a real bear to get clean: That was a good stopping point anyway. Now for the next section! - Zombie


-
Yup, that smaller square garbage can is almost a lost cause. But with the cracks fixed now, that gives it a new lease on life. I may plug the ends of the rim on the top with some plastic to hopefully prevent new cracks from forming, and I think it would benefit from screening on the corners that are left so it give you something to grab on to. I don't think oils were the cause of the crack in this case. Everything was clean. I'm guessing it was just a matter of not heating the two plastics up to a high enough temperature in order to create a good bond between them. I also made the mistake of lifting the can by the "fixed" rim with a partially filled can and that probably was too much weight for the plastic to handle. Old habits die hard. As for the round garbage cans, they dried perfectly. I put them out in the sun today to "bake" the finish and then put the fan on them again to hopefully draw out any volatiles. Sanded them down today so they are almost ready for the final coat. I did notice that I missed a crack on one of them, so I think I need to rescrape the area, weld it and prime it. Well on to some painting. Back to the east wall of the building, this time right above the areas I did last year. There was some bricks where the paint was failing so I had to scrape, wire brush and dust off the bad areas: Needs to be caulked and primed yet, but I want to get a bigger area ready so I can be more efficient. The one good thing I noticed so far is that nothing needs tuck pointing which means I can breeze right through. Hopefully. - Zombie

-
I don't usually need to touch the polyurethane to determine how far along in the drying process it is. If I brushed it on, a good visual cue that the paint is dry is the lack of brush strokes and appearance of sags/runs. Another cue is the smell (stronger, more "chemically" when wet and a sweeter smell when dry). With that said, sometimes I do touch just to gauge how fast it's going. Well, back to plastic welding again! The other week I turned on the soldering iron because I was planning on doing a little touch up. I was filling some buckets up for flowers in the meantime and noticed that one was leaking. Got a different bucket out and transferred the water over and that one leaked too. When it rains it pours it seems. One had a small crack along the side near the bottom. Fixed that up with no issues. The other one was cracked in approximately the same area. I wasn't really sure if I fixed it because there was a natural seam around the circumference. How far did it go? Better to be safe than sorry so I went along the entire seam just to make sure: There was another bucket that was leaking along the bottom so I hopefully fixed that. Remember that bucket that I melted a hole straight through it because the plastic was so thin? Added some more plastic to close the hole and smoothed it out. Maybe usable, gotta test that one carefully. Finally, there was a bucket with a bottom that was almost falling off because of a long crack that was running along the rim on the bottom. Welded that up, added some plastic and smoothed it out. Here's what all 3 looked like (L-R): You can see that at the bottom of the pic there is another garbage pail on the ground that looks like the flower cutting one in the backroom, only shorter. It was in rough shape with multiple cracks and most of the top rim missing. Plastic welded all that up: I smoothed it all out recently and also softened the cracked edge so that there were no sharp areas. Better? Yes. I just stopped the bleeding though, it's still missing a lot of plastic and that would be very difficult to fix. Speaking of the garbage can in the backroom for the flowers... remember the rim I created to fill the spot that was missing? Well, that cracked recently too. I think it was due to that sacrificial piece I grafted on there - it didn't bond decently. I melted the whole thing back together and also melted in a piece of screening on the top of the rim to prevent a crack from forming there again. I'm still planning on using another strip of screening and melting that into the side of the rim just to make sure it's all supported. Who knows, it may actually be a good idea to do that to all the corners. Sometime. - Zombie


-
I went through the bottom of both the garbage cans and welded that all up: Some spots here and there, it wasn't too bad actually. Some of the cracks were in the corner between the side and the bottom and those were very difficult to get at. There really was no way to zipper weld the cracks so I concocted another method where I'd widen the crack with the soldering iron and then fill that back in. Seemed to work okay so I'm happy with that. Here's what the inside looks like: Maybe could use some more smoothing, but it's all welded at least and that's the most important part. Since the weather has been cooperating recently, I painted the outside of the cans with polyurethane today: This is one coat, it'll probably need another sometime. I put the fan on it overnight hoping the paint will set quicker (we had rather high humidity today and that hinders drying time). And since I had the brush in the polyurethane, I may as well do the threshold of the door: I leaned a board (to the left of the door right now) against the wall and in front of the threshold to prevent people from trying to step in it, and to protect it from any dew or morning moisture, and also to keep leaves from the trees from getting stuck in the tacky paint. Hopefully it dries overnight decently. Still needs another coat, I may have some polyurethane from the back cooler floor that has sand in it for traction. Recently one of our flower and supply wholesalers was running a special promotion: buy 2 gallons of concentrated liquid flower food and you could buy a hand-held proportioning unit for $35. We use a lot of flower food so a couple extra gallons is always a good idea. And for the unit cost, well, it's just a little bit more than a gallon of the food which is a small price to pay. Got that in and it's pretty impressive: You hook it up to a garden hose via the brass fitting, add the food into the container, set the rate, pull the trigger and presto, a filled bucket with the correct concentration. Just to note, I looked up the price of this unit from our wholesaler... no promotion... it would cost $125-ish. With our discount and a little negotiating I could probably get it for ~$100 (or maybe just under). So for a $65 savings we get another proportioning unit. Not bad! - Zombie


-
Thanks! Necessity is the mother of invention... or something like that, right? I should've really recruited the help of another person to operate the drill while I did the grinding, but it all worked out in the end. Well, here's what the cart looked like with one coat of blue paint on it: I made a little bit of a mistake and added some turpentine to aid in rolling, but all it did was create bubbles in the paint and caused it to take forever to cure. We're talking 3 days - and it was still a little tacky to the touch. To help that curing process I put the fan on it over the weekend and that did the trick. Had to sand the entire thing down to get rid of the bubbles and finally rolled on another coat this past Wednesday: I used a light touch on the roller this time too so there were not too many bubbles. It dried fine this time but I did put the fan on it overnight. It probably needs another coat so I'll try to get that done this week. It certainly looks a lot better, that's for sure! Back to the garbage cans themselves. They were really filthy inside so I bleached them out and took a pic of the inside when it was dry: This is when I noticed that some of those cracks on the bottom actually went through to the inside. There's a crack on the bottom in the 3 - 4 o clock position and you can clearly see another crack to the left of the 6 o clock position on the side. Gotta fix this up! This is what it looked like after fixing the major cracks: You can probably see there are a lot more cracks along the side near the bottom. I did fix these up, but it was pretty difficult because the cracks were at the bottom of a tall can and my arm is only so long. Had to actually stick most of my head down in there to see something and to reach the cracks. Not fun. I tried to match the areas I fixed outside to the inside to focus my efforts on those spots. After the insides were mostly complete, I also addressed the bottom too as there were a couple bigger cracks there too. I'm pretty happy with my efforts, but I need to take a closer look at them yet. - Zombie


-
Maybe. I have a real issue with using gasoline to dissolve the styro. Gotta be really mindful when messing around with gas as the vapor is heavier than air. Suppose that could be done outside somewhere... Ok, so now it's time to fool around with the screw collars. The one that was broken off and had half missing required a bit of filling to get it back into somewhat of a cylinder: Just used black sacrificial bucket plastic for this. It's not the most beautiful looking piece, but hey, at least it's functional. So that fixes the broken one. But I'm missing another one completely. How to make it, that was the question running through my mind for quite a while. I could have just started to build up plastic from a blob but I actually used a strip of sacrificial bucket to build on that. I added plenty extra so the cylinder was wider: The strip idea was great because it gave me something to hold on to when depositing the plastic. Now I needed to machine this down to a size that would fit the stub that was still present on the top. Drilled a hole in it and immediately cracked the thing down both sides. Well, darn. While inspecting it, I noticed that the crack happened where the strip was. So maybe the plastic I deposited on it didn't bond properly - melted everything back together again. Then carefully drilled the hole again. Had to cut part of the end off so that it wouldn't be so high. In order to machine the piece into something that looked like a cylinder, I put a long, thin bolt through the hole, put a couple nuts on the end, tightened it up carefully and chucked it into the drill. Feathered the speed of the drill with my left hand and used a rasp in my right to remove some of the excess: It actually worked surprisingly well. So now I had two loose screw collars. Really spent some time melting the collars into the top because I was worried that they would crack off. Spray painted the tops and put one top back together (also notice the blue cart has one coat of paint on it): Looks pretty darn good if you ask me. The next day I worked on getting the other top completed. Here's the inside with my fabricated wood piece all painted up: The flapper should be sitting below the opening but it was basically even. Here's what the two cans looked like (the left one is the unmodified top, the right one has the new screw collars and wood connector): The gap is a little wider on the right one. Probably could have left it alone as it did work, but I took the whole assembly off and added some more plastic to the collars to make them taller: And here they are, unmodified on the left and modified on the right: I call that close enough! At least it works. The tops are going to need one more coat of spray paint and then they should be complete. Next time I'll discuss fixing the inside of the cans as well as the bottom. - Zombie


-
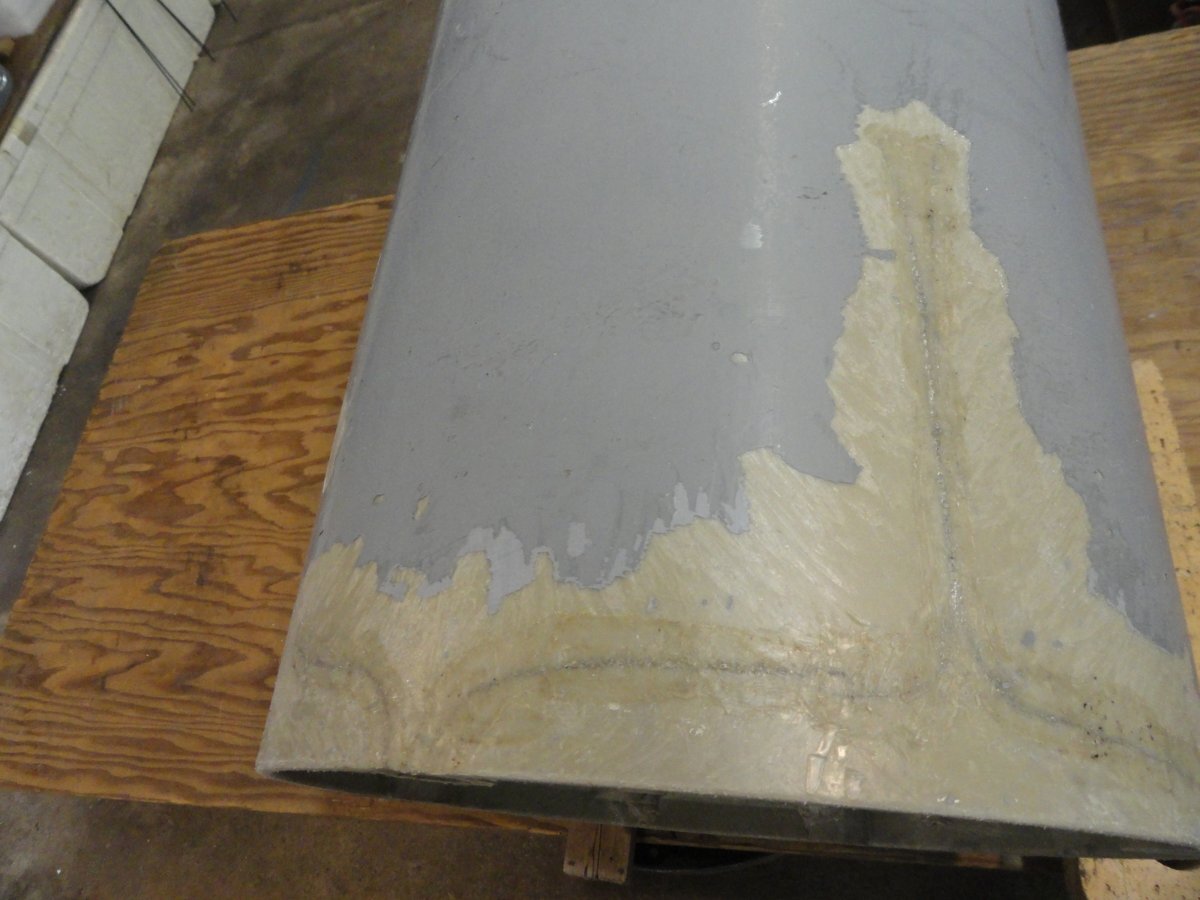
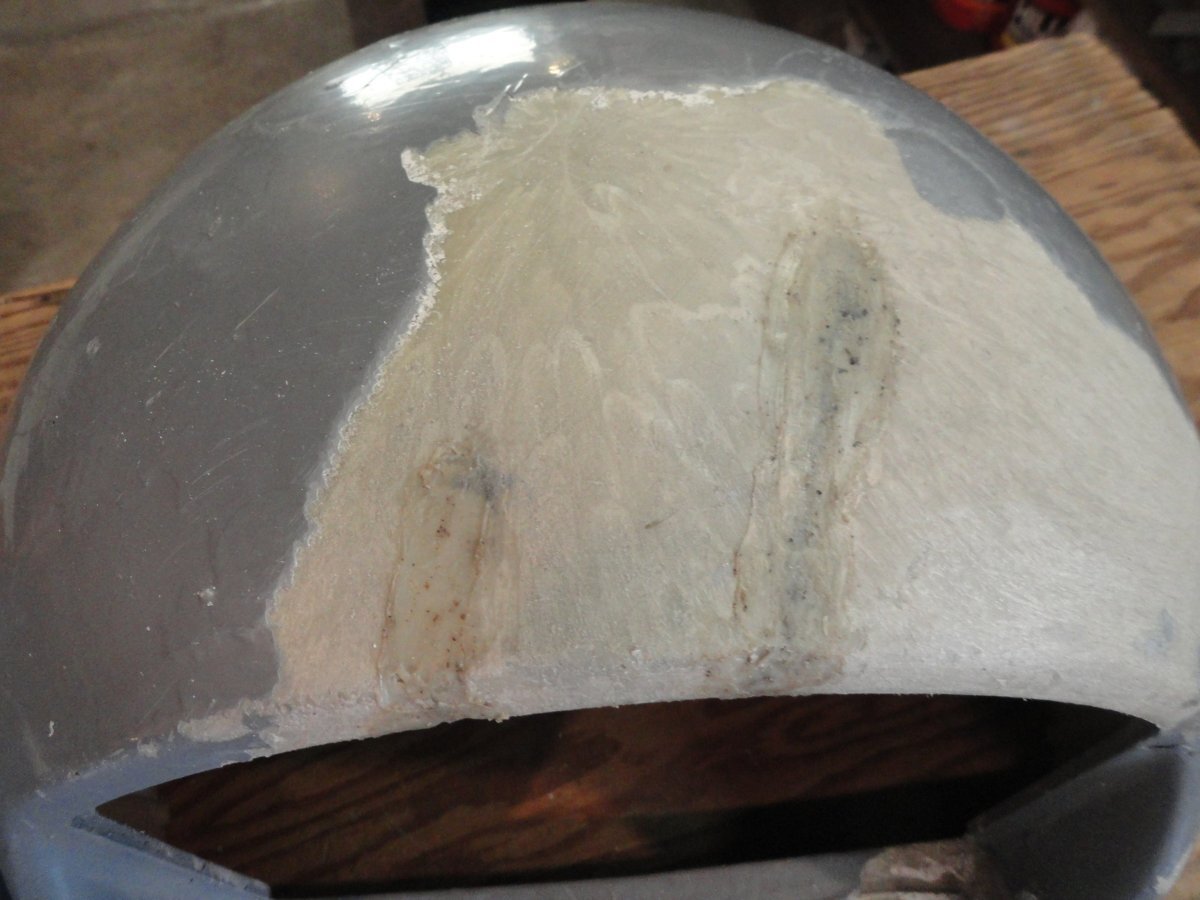
I doubt it. There's gotta be a reason behind it, maybe it's weight reduction or easier to manufacture/attach. It just seems odd to have that many air bubbles in the plastic. It wasn't much trouble to do the curved ends actually. I cut off as much as I could with the saw. To make the rounded top, I used a rasp to remove the excess and then rough sandpaper to remove the marks. For the inside of the rounded parts, I drilled as much as I could, then chipped the rest out with a flat blade screwdriver with sanding to follow. So let's head on over to the garbage cans themselves. There were cracks on the sides which I forgot about until I started scraping. The epoxy I used the last time didn't stick too good so it all came off easily. For the first one I started scraping and the longer I went, the more cracks I found. I figured that was a good thing - try to reveal all the cracks so that they can be fixed. The first pic is upside down for some reason, but I think you can get an idea of what I was finding: More cracks: And cracks that combine and fork off: And more cracks along the bottom: I actually sanded the sides a bit to remove as much old paint and primer that I could. When all the scraping, sanding and dusting was complete, I plastic welded the cracks: And more plastic welding on a different area: And then the last area: Have I mentioned this took a while? Yup, sure did. But it turned out pretty good. My only worry was the paint stuck in the cracks as that may cause the welded crack to be weak.I figure it's better than epoxy though. The other garbage can wasn't much better as I soon found out: The big crack took a lot of work to get it to sit flat again with many passes with the plastic welder. Did a little excess scraping on the other side of the can as I wasn't sure how far the cracks went there: It wasn't too bad, but needed help. After revealing most of the rim, I plastic welded the cracks, sanded the area and inspected the cans for spots I may have missed. After getting all that done I primed the areas I scraped down to bare plastic: This project took about 2 days to complete, with maybe 4 hours of work going into it total. But I'm happy how it all turned out. The primer I used on it the last time really stuck good, so I'm also happy I'm using the same stuff this time around. Going to paint the outside with polyurethane instead of spraying as that will be more cost effective. However, I'm not going to do that quite yet as I think I need to address the inside of the can yet. Some of the longer cracks that run up the side do go through to the inside so those will need to be welded yet. The cracks that ran along the bottom rim didn't look like they went through, they were just superficial. Maybe? I need to look at that closer. - Zombie


-
I have my doubts about that working SV, PS isn't the strongest plastic out there and it can be quite brittle. I will also mention that polystyrene isn't what the buckets are made of so that means it wouldn't stick. Anyhow, back to the garbage can lids! This is what the inside of the top is supposed to look like: Well, imagine there are no cracks in it, okay? There are two screw collars where the flap assembly is attached to the top. So for this one, I fixed the crack in the right collar so that should be good to go. And this is what the assembly looks like installed: This one works great, no problems! The other top suffered significant damage which broke off one screw collar leaving only a stub behind and the other was hanging by a thread: And a different angle: I never recovered the broken off collar so that was gone. The other one (or what's left of it at least) is still present, but broken off below the surface. And obviously half is missing - I didn't recover this piece either. You can see that these collars are not solid plastic for some reason, they are porous. Don't ask me why, it seems like a serious design flaw. Another thing that was missing was the piece holding the flap assembly to the top (see second pic). I never found this piece. Without this critical part, the flapper can't be attached to the lid. Thought about creating one out of plastic for a nanosecond but that would've required a ton of work. How about wood though? Certainly possible. Found a piece of wood almost the exact size, cut it to size and then modified it to approximate the other piece. This is what the top looked like: And side: And bottom: Not perfect, but functional at least. This piece will not see too much weathering, but humidity could be a concern so I soaked it in wood preservative for a couple hours: It's my homemade concoction of 1 part boiled linseed oil, 1 part oil-based commercial wood preservative and 1 part paint thinner (the original recipe calls for turpentine instead of paint thinner which I didn't have when mixing this batch up). After soaking, I hung it up to dry over the weekend. Great, so I can cross this off the list. Before heading out, I primed the threshold of the door: That hydraulic cement really cures fast so I think that was enough time to set up properly. Before priming, I sprayed the hydraulic cement patch a couple times with water just to make sure that the cement wouldn't wick the moisture out of the primer. I have since put a second coat over this because there were some pores that needed to be filled in. Next up on my list of things to fix was the garbage cans themselves. I'll get into that nightmare more next time. - Zombie


-
So this is what the inside of the top to the garbage can looked like. I jammed a putty knife in the bigger crack so you can see how long it is: You can also see the smaller crack on the right and it should be pretty obvious that the screw collar on the right is also cracked. That's not good. First things first though is plastic welding the cracks on the outside of the top and smoothing it out: There were some low spots on these welds but they look pretty clean overall. Next up is plastic welding the inside including the screw collar: This turned out better at least. To fill in the lower spots on the outside I just used some of that sacrificial black bucket plastic and dabbed that in there. After it cooled, it needed some sanding to get it smooth: There were a couple holes in the back (for what they were used for, I don't know) but they were filled in with black plastic too: Did a lot of scraping around the rim too. Then I primed the thing along with painting the hardware on the mop wringer (just used black paint on that): The van with the cracked bumper is in the background. So yeah, a lot of work went into this so hopefully it'll hold. - Zombie


-
Besides the garbage cans, I also worked on that gray pail. I pulled off the wire mesh on the outside and filled that low spot with black sacrificial bucket plastic instead. I was worried that it might melt through because it's a higher melting point plastic, but I was careful and got it to work: I also added a little fill on the inside and fixed the crack: This needs to be leak tested yet obviously. Here's what the mop wringer looks like: And here's the inside all fixed up: I consider the plastic part of the wringer complete now. Since I had to take some of the rusty metal bolts and connecting rods off to access the crack, I started to fix them up. Oh, I caulked around the threshold of the door that I remade. There was still a lower area on the left side where the Bondo didn't hold. I didn't have enough of that left to fill that part in so I got some hydraulic cement at the hardware store because I needed something fast setting. The directions called for 3 parts cement to 1 part cold water. I used 3 parts cement and 1 part bonding agent to hopefully get it to stick better. Here's what it looked like: I actually got that area pretty smooth now. Needs a few days to cure completely, than I can prime and paint and cross my fingers that it doesn't go bad so soon. - Zombie


-
I kinda got side-tracked on a different project today. Was dumping the garbage out of our two round garbage cans and noticed the top of one was cracked. You may remember I tried fixing it a few years ago by using epoxy. Apparently the top fell off a few times and broke along the epoxy-filled crack: And here's a closer pic of the issue: Well, if epoxy will not work, then how about plastic welding? Had to do a lot of sanding to get the joint down to raw plastic (it's technically fiberglass). I also tried to pick out as much old epoxy from the crack as I could before starting the plastic welding: After I zipper welded the crack, I smoothed it out: Didn't need to add any fill either. Just sanded the area to get it smooth again. Time for the inside: You can see the hole I drilled in the top a few years ago to prevent the crack from propagating farther - it's still filled with epoxy. After smoothing that out, I primed the top and sprayed it with gray paint again: Can't even tell I did plastic welding on it - totally seamless. While inspecting the inside of the other top, I noticed that it was cracked in a couple spots: The longer crack is on the right and the shorter one is to the left (it's the darker line). So, I'm going to have to fix that too. Another issue you may have noticed in the first pic is that the flapper for the opening on the first lid was broken off ages ago. I kept it luckily, but must've lost the part that connects to the lid. I'll take some pics of that tomorrow. - Zombie


-
Oh, I'm positive you could do it SV. I had basically 0 skill in plastic welding before this year (well, that's not entirely true as I tried my hand at it a few years ago with little success). Watch a few YouTube videos, and practice as often as you can. It's not exactly rocket science. Honestly, it's a good skill to gain as you'll find all sorts of applications these days because almost everything is made of plastic. There probably aren't many skilled plastic welders out there either. Nah, us drivers are completely up-front with bossman if we caused damage to a van (actually, I think he caused this crack). It is what it is. Accidents happen. Luckily I only caused a little dent in one of our older vans back in 2016-ish? The thing with me though is that I'll try to fix it - even damage caused by a different driver. It doesn't make sense to file a claim with insurance if it's something minor (like this crack) so if I can fix it on the cheap we can keep our premiums low for the serious stuff. Yeah, there was a few times where our old driver had a minor fender-bender and I fixed it without getting the bossman involved. Most times I fix the problem so good that there's nothing to see and he's fine with that. - Zombie
-
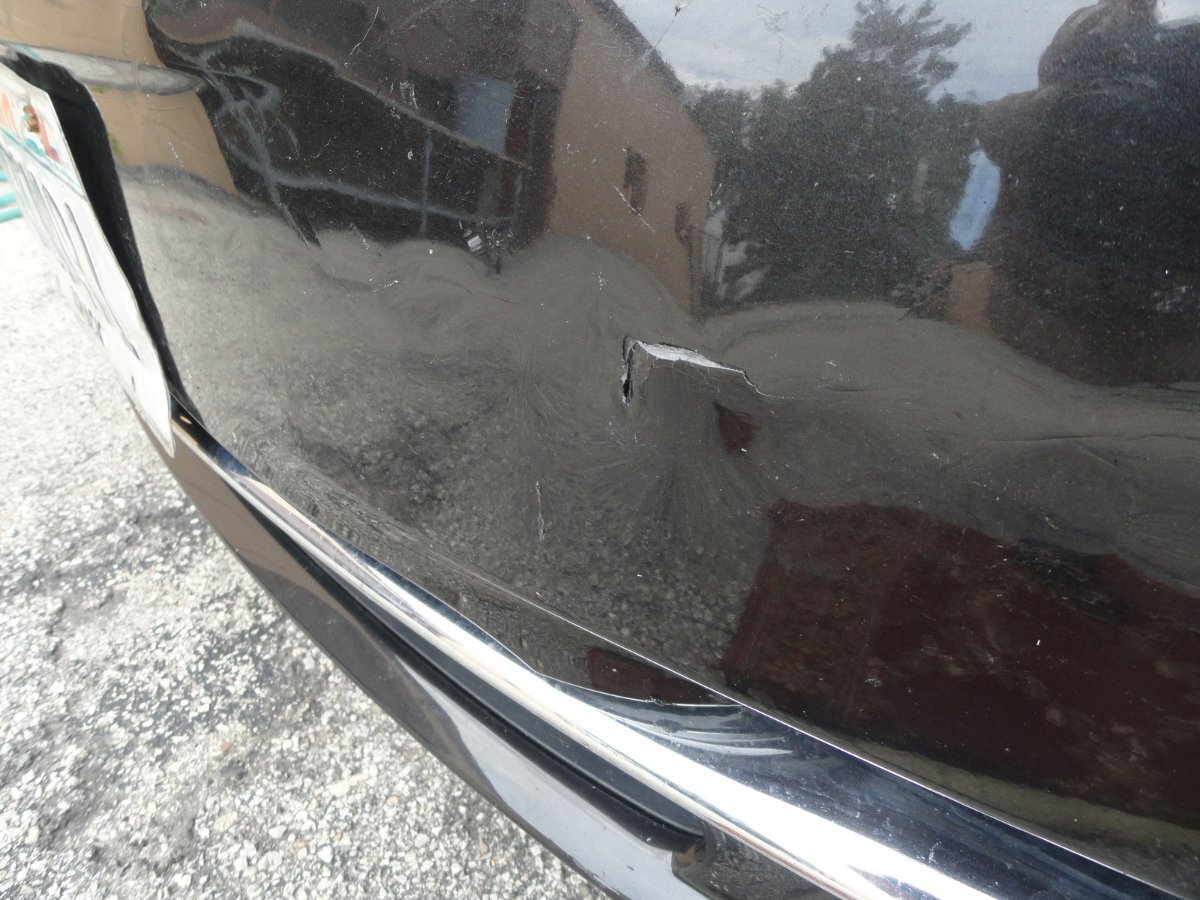
The reason I tackled the van project was because the bossman asked me if I could address it. We've had the service centers plastic weld bumpers/front grills for us before whenever we had a crack, so they can do it with passable results. It's just that they charge an arm and a leg for the work. So, yeah, if they can fix it, then I can too. And I don't quit when the job is only passable, I do some more steps to make it look decent. Really, there isn't a giant chance of messing up so bad that the bumper would be completely ruined (at least for me there isn't). I started out by assessing the crack and what it was doing, and then formulated a fix. This plan was relayed to bossman and then I went ahead by carefully doing a plunge into the top part of the crack to see if that would allow the piece to sit flush with the bumper. It did, so I kept going. While doing so I was constantly looking at how the bumper plastic was reacting to the heat and melting. The bumper appeared to melt at approximately the same temp as the black bucket material so I used that for fill. Anyhow, took a pic of the repaired area with paint on it the other day: I do see some porosity, so I may just sand off the paint and apply some Bondo, sand that flat, then repaint. From 5 feet away though, it looks fine just the way it is. Also, directly next to the left side of the repair the bumper is dented in there yet. I guess I could fill that in with more sacrificial bucket plastic. Or I could Bondo over it. Not sure which method would be better, I'm assuming that the less Bondo used, the better. - Zombie

-
Had to do an emergency fix on the bumper of one of our vans today. There was a pretty good sized crack from someone hitting who knows what: Fiberglass bumper, so it's the perfect theater to showcase my plastic welding talents. Ahem. First I had to investigate how to get this crack flush again. I figured that since the bottom piece of the horizontal crack was sticking out and I couldn't push it back into place that I would stick the hot soldiering iron tip in the crack to widen it. Worked good and it allowed the vertical crack to sit flush again. Now that both areas were even I sanded the paint off as much as I could and zipper welded the two sections together. Then it was just a matter of smoothing it out and filling in the low area with some sacrificial black bucket plastic: Sanded that down and this is what it looked like: Put a couple coats of black paint on it and it should be good to go. Sorry, forgot to take a pic of this, I'll do that tomorrow. With that out of the way, it was back to the square garbage container. Finished filling in that last corner on the bottom. This is what it looked like on the inside: I was happy to see a lot of black plastic inside as that meant that it should hold together better. Tried digging around the weld on the outside bottom to see if any of it would come loose. Other than a few small flaps (which I welded back down) it was all tight. I was originally going to add a ridge along the perimeter of the bottom but decided last minute to just do the corners for now (would require lots of work and I needed to get the thing back up for Monday). Here's what one corner looked like: Good enough for now me thinks. If I have a crummy weather day I can mess with it some more. The edges will need to be much higher and maybe thicker too. I was thinking that I could always graft on a piece of plastic in the center to help protect the bottom more. As for the corner of the top which was missing, my transplant was successful but wouldn't win any beauty pageants. It was still pretty rough so I spent a little time rasping it and sanding it down. Gotta check this out: Friggin' amazing! It's literally perfect. Probably my best work yet! It's a little wider than the other corners so the flower cutter frame is tighter when seated, but that actually may be a good thing. The bottom of the rim is a little rough yet, but that can be fixed with some more sanding. Best of all, it looks like the black plastic bonded to the grey. Really happy about that. - Zombie


-
Worked on the trash can today again. First up was trying to fix the bottom since there were areas that were worn open. I found that the normal black plastic bucket material was semi-compatible with the plastic of the garbage can. The areas that were worn down were quite thin so it was a little fiddly trying to get enough plastic to bridge the gap without melting through. Think I did a pretty good job overall and finished 3 corners at least: I'm using the duct tape to hold the side tighter to the bottom so that the plastic can set up without pulling apart. Haven't poked around on the weld to see if it will hold, but the ends aren't curling up which is a very good sign that it's bonding. As for the missing corner, I ended up using a wider strip of sacrificial black bucket and then tacking that into place. Once one side was cool and solid, I bent the plastic around to the other rim and tacked that into place. When that cooled, I molded both sides to the gray plastic of the garbage can and then added some more to the bottom of the corner since the black plastic was thinner. Oh, and to fix the top, I just melted black plastic blobs and applied that to either side till the hole was closed up. Took a pic of the corner along with what is left of the strip: Seems pretty solid to me, but it's going to need more smoothing and possibly modifying to fit in the frame of the flower cutter. Took a pic of the bottom rim of the bridged corner: Perfect? Nope! But I think it's functional at least. Hopefully I can get the last corner of the bottom filled tomorrow. What's left after that? Well, I think I need to add a ridge of plastic along the perimeter of the bottom so that the middle doesn't scrape along the ground when the can is filled with garbage. A couple points, if I may. First, there is nobody around the shop that can apply the paint quicker and more evenly than I can. So it'll take someone else longer to apply the stuff and they will end up using more paint to get even coverage. And that costs more money, not to mention that whoever is doing it will have to walk outside to switch the easels out when dry, whereas I'm closer since I was painting the cart in the small garage anyway. Secondly, I believe I get paid less than the designers not to mention there aren't other employees in my area of expertice with less seniority to delegate the work to. It's just me. - Zombie


-
Seems obvious to me, but someone color blind perhaps? I just hope the paint inside matches. Actually, it doesn't matter too much since a full can will cover the entire cart easily. I don't know how I'm going to handle that fix yet. Gotta think on that a little. I could graft a piece of plastic in there assuming I find a surrogate piece with roughly the same melting point. Or I could melt in some screening and then build up the plastic corner by depositing the molten plastic on the screening until it's covered. The second option would take more time. -------------------- About a month ago, one of the local funeral homes gave us back some wire easels which are used for standing spray arrangements. I forgot to take a pic of what those arrangements look like, but I think you'll get an idea fom this pic I took a couple years ago: Anyhow, some of the easels were showing some rust so I wanted to fix that so they were usable again. Here's what a typical used easel looked like: Not really green anymore - it's more of a teal blue than anything, and there''s rust spots here and there. This is where that green spray paint comes into the picture. I put 2 easels on table made with two sawhorses, chucked on a couple boards and cardboard (you may recognize these pieces, I kept them from years ago), then sprayed just the front side: That can did 7 easels total and cost $11. New easels cost anywhere from $6-12 depending on size so figure $1.57 on paint plus my time, totally worth it. Probably will get another can to finish the rest although not all of them are rusty. Had a little time this afternoon to paint the sides of that rolling blue cart with some of the older blue paint. This is what it looks like currently: Better! I did the sides first because I'm going to be rolling the shelves at a later date and since it'll probably drip on the sides anyway, I figured that I'd roll everything with the new color just in case there's a difference. Oh, there's a bunch of those used easels in back of the cart. - Zombie


-
We'll see if the bucket leaks, that will be the litmus test. I'm not 100% happy about the quality of the weld either, but maybe with the fill it will get better As for old buckets losing their pliability, I haven't seen that at least with the buckets we have. Normally, plastic just gets brittle as it ages, and for the most part that is true. Our buckets hardy ever see sunlight (specifically UV light) for any extended periods so that kinda keeps them in decent shape. These cracks I've been fixing are due mostly to wear and tear and a design flaw in the bucket molding process, although, I can't discount the possibility that they are getting brittle due to age. Did a little shopping today at the hardware store: Got a can of dark green spray paint to cover over some slightly rusty easels which I'll cover another time. Also got a can of gloss royal blue oil paint for the metal cart. The newer can is on the bottom, older on the top. Same name, same code, maybe a different color? Dunno, but we will find out soon enough. Picked up some more foam roller covers (not shown) and a gallon of glass cleaner concentrate. Been using this brand for a number of years now because it's strong (even diluted) and goes a long way. Anyhow, back to plastic welding. Our flower cutter in the backroom sits on top of a Rubbermaid square trash can. It was used when we got it so it had some wear. Due to misuse or overloading, it's starting to show it's age. Problem one is a crack along one side: And this is what it looks like after the zipper weld: This plastic has a fairly low melting point so I had to be really careful not to punch through. Kinda have to use a light touch - no pressure on it whatsoever. While waiting for that area to cool off, I worked on the top corners since they were cracked up too: This corner has a cracked off corner, so I just fixed the cracks along each side.I'll deal with the missing part later. First I have to find a sacrificial plastic which will work as a fill. Once the large crack on the side cooled a little, I was able to smooth out the zipper weld: The inside area of the crack also needed to be zipper welded: I was able to smooth the weld out but didn't take a pic of it. Anyway, this was the initial round of fixing, it's going to need lots more work. - Zombie